How to Spray Paint House Exterior?
Spray painting the exterior of a house sounds simple enough. Point, press, paint – right? If only it were that easy. In reality, spraying a house exterior is a careful dance between preparation, equipment control, weather timing, and good old-fashioned patience. Done correctly, it can transform a tired façade into a sharp, modern masterpiece. Done poorly, it can turn your driveway, windows, and even your neighbor’s car into abstract art.
Let’s walk through the right way to approach exterior spray painting – and why, in many cases, calling professionals like Rennewservices is the smartest move you can make.
Why Choose Spray Painting for Exterior Walls?
Spray painting offers several advantages over traditional brush and roller methods.
– It provides smooth, even coverage
– It works quickly on large surfaces
– It reaches into cracks and textured materials
– It reduces visible brush strokes
On stucco, brick, siding, or large flat panels, a sprayer can produce a factory-like finish. The key word here is “can.” The equipment is powerful, and improper handling can cause drips, overspray, uneven coverage, and wasted paint.
Professional crews such as Calgary painters contractors understand how to balance speed with precision. That experience makes a significant difference in the final appearance and longevity of the finish.
Step 1 – Surface Preparation Is 80% of the Job
If there is one truth in exterior painting, it’s this: preparation determines everything.
Before any paint touches the wall, you must:
– Pressure wash the surface
– Remove dirt, mildew, chalking, and loose paint
– Repair cracks and holes
– Sand rough edges
– Allow full drying time
Painting over dirty or damp surfaces leads to peeling and bubbling. Exterior walls must be completely clean and dry. Even small particles can prevent proper adhesion.
Professionals often inspect siding, trim, caulking lines, and flashing. Damaged caulking should be replaced. Wood rot must be addressed. Ignoring these steps is like putting a fresh coat of paint over a cracked foundation – it might look good for a month, but it won’t last.
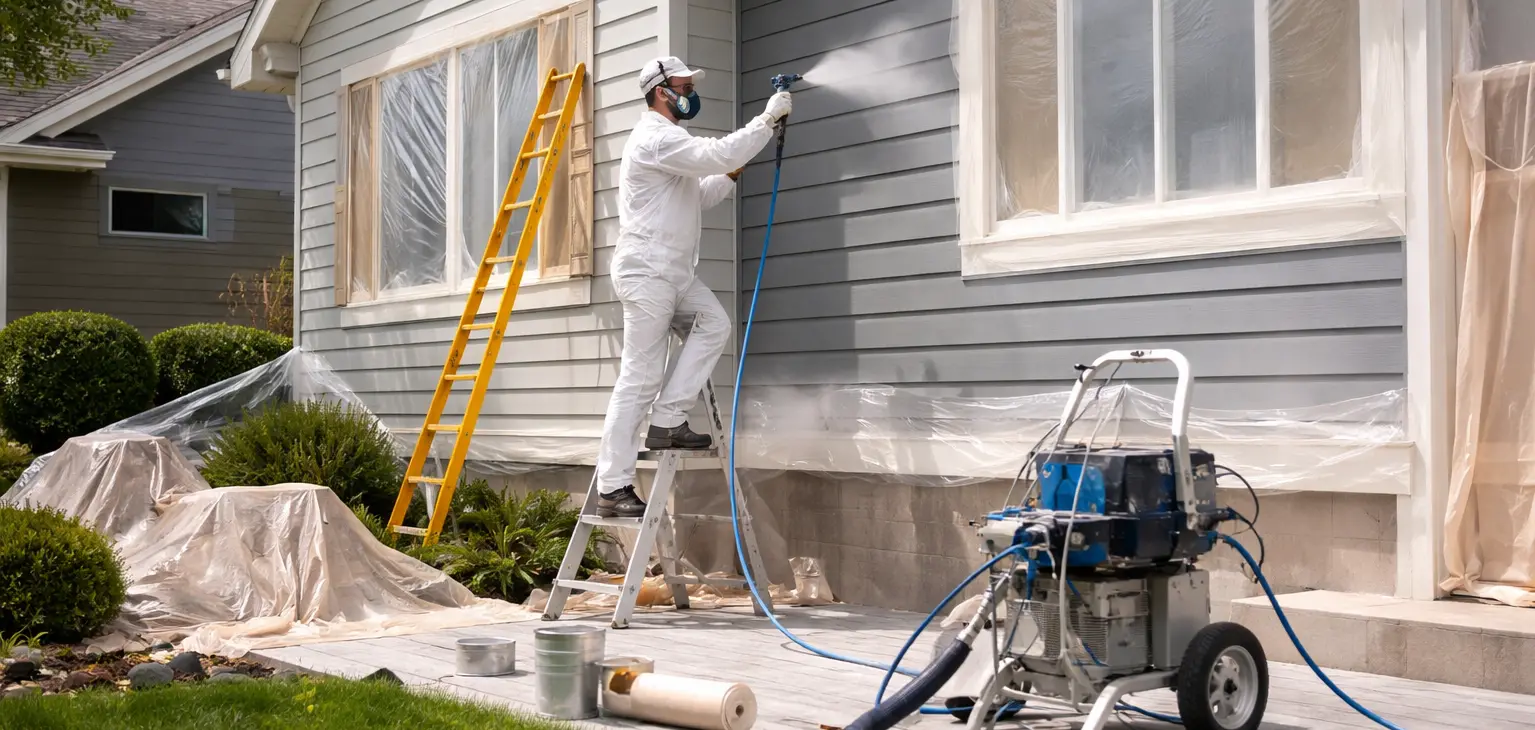
Step 2 – Masking and Protection
Sprayers atomize paint into a fine mist. That mist travels.
Everything not being painted must be covered:
– Windows
– Doors
– Gutters
– Light fixtures
– Roof edges
– Landscaping
– Walkways
Plastic sheeting, painter’s tape, drop cloths, and masking paper are essential. A slight breeze can carry overspray several meters. Professional painters monitor wind speed and direction carefully.
This is one area where experienced Calgary home renovators truly shine – precision masking saves hours of cleanup and protects property value.
Step 3 – Choosing the Right Equipment
Not all sprayers are equal. For house exteriors, professionals typically use airless paint sprayers because they:
– Handle thick exterior paints
– Deliver consistent pressure
– Provide even atomization
Tip size matters. Pressure settings matter. Distance from surface matters.
Too much pressure causes excessive overspray and bounce-back. Too little creates uneven texture. Holding the sprayer too close creates runs. Too far away causes dry spray and patchiness.
The correct technique involves:
– Holding the gun about 10–12 inches from the surface
– Keeping the spray perpendicular to the wall
– Moving at a steady speed
– Overlapping each pass by about 50%
It sounds simple. It takes practice.
Step 4 – Weather Conditions Matter More Than You Think
Exterior painting is heavily dependent on weather.
Ideal conditions include:
– Temperatures between 10°C and 30°C
– Low humidity
– Minimal wind
– No rain forecast for at least 24 hours
High humidity slows drying time. Extreme heat causes paint to dry too quickly, leading to lap marks. Wind creates overspray chaos.
Professional painters plan projects around weather windows and adjust products accordingly. They also understand how different substrates react to temperature changes throughout the day.
Step 5 – Priming When Necessary
Primer is not optional in many cases.
You should prime when:
– Painting over bare wood
– Covering stains
– Changing from dark to light colors
– Painting porous surfaces like brick or stucco
Primer seals the surface and ensures uniform color and adhesion. Skipping primer may require additional topcoats, which increases cost and labor.
Professionals evaluate the surface condition before recommending whether priming is needed. That decision can dramatically impact long-term durability.
Step 6 – Spraying Technique – Consistency Is Everything
When spraying, consistency beats speed.
Follow this method:
– Start spraying slightly before the edge of the surface
– Release the trigger after passing the opposite edge
– Keep your arm moving in smooth, controlled strokes
– Avoid wrist flicking
Paint should go on in thin, even layers. Multiple light coats are better than one heavy coat.
Heavy coats lead to runs. Runs lead to sanding. Sanding leads to frustration.
Professionals often apply back-rolling after spraying on certain surfaces. This technique involves rolling the paint lightly to push it into pores and create better adhesion. It’s an extra step that increases durability.
Step 7 – Drying Time and Second Coat
Most exterior paints require at least two coats for full coverage and durability.
Follow manufacturer guidelines for recoat times. Applying a second coat too soon can trap moisture. Waiting too long may require additional surface preparation.
Experienced crews track drying time carefully and monitor surface conditions before applying additional layers.
Common Mistakes DIY Homeowners Make
Here’s where things get interesting.
– Underestimating prep time
– Using the wrong sprayer tip
– Ignoring wind conditions
– Applying paint too thick
– Failing to protect surrounding areas
– Choosing low-quality paint
The result? Uneven texture, peeling within a year, stained landscaping, and hours of cleanup.
Spray painting a house exterior requires not only equipment but skill, timing, and an understanding of building materials. It’s not just about color – it’s about protection.
Why Hiring Professionals Is Often the Smarter Investment
Exterior paint serves two purposes:
– Visual transformation
– Protection from moisture, UV exposure, and temperature shifts
When applied correctly, high-quality exterior paint can last 8–15 years depending on materials and climate.
Hiring experts like Rennewservices means:
– Professional surface assessment
– Proper preparation and repairs
– High-grade equipment
– Skilled application techniques
– Warranty-backed workmanship
– Clean job site management
Professionals also carry insurance and safety equipment for working at heights. Ladders and sprayers can be a risky combination without experience.
While DIY might save some upfront costs, poor execution can lead to repainting much sooner than expected – which ultimately costs more.
Final Thoughts – Is Spray Painting Worth It?
Absolutely. Spray painting is one of the most efficient and visually impressive methods for exterior house painting.
But it’s a tool, not magic.
The true difference lies in preparation, technique, material selection, and timing. When all those elements align, the result is stunning – crisp edges, even coverage, vibrant color, and long-lasting protection.
For homeowners who value durability, efficiency, and a flawless finish, working with experienced professionals ensures the project is done right the first time.
After all, your home deserves more than a quick spray and hope for the best. It deserves precision, expertise, and craftsmanship – exactly what trusted painting specialists deliver.